As a Community Manager, it is your job to read all messages and comments that come in over a wide variety of platforms, respond to them promptly and at the same time ensure that the mood on your social media profiles remains positive. That’s a lot to do!
In this guide, we’ll show you how to use Fanpage Karma Engage to prioritize and sort messages, share them among co-workers, get feedback, and automate processes to ensure that all requests are met as quickly as possible.
(Click to enlarge screenshots.)
1. One Inbox for All Social Networks & Email
Fanpage Karma receives messages, comments, user posts and mentions from Facebook, Instagram, Twitter, LinkedIn, YouTube and WhatsApp in a single inbox. Plus, all your emails are delivered there, too. In other words, you can handle all conversations in a single tab!
You can find the Inbox under Engage in the main navigation.
The Structure of Engage
Engage is divided into three areas. In the left bar you will find all message folders (1), in the middle all conversations of the selected folder are listed (2) and on the right you will find the chat of the selected ticket (3), out of which you write your replies.
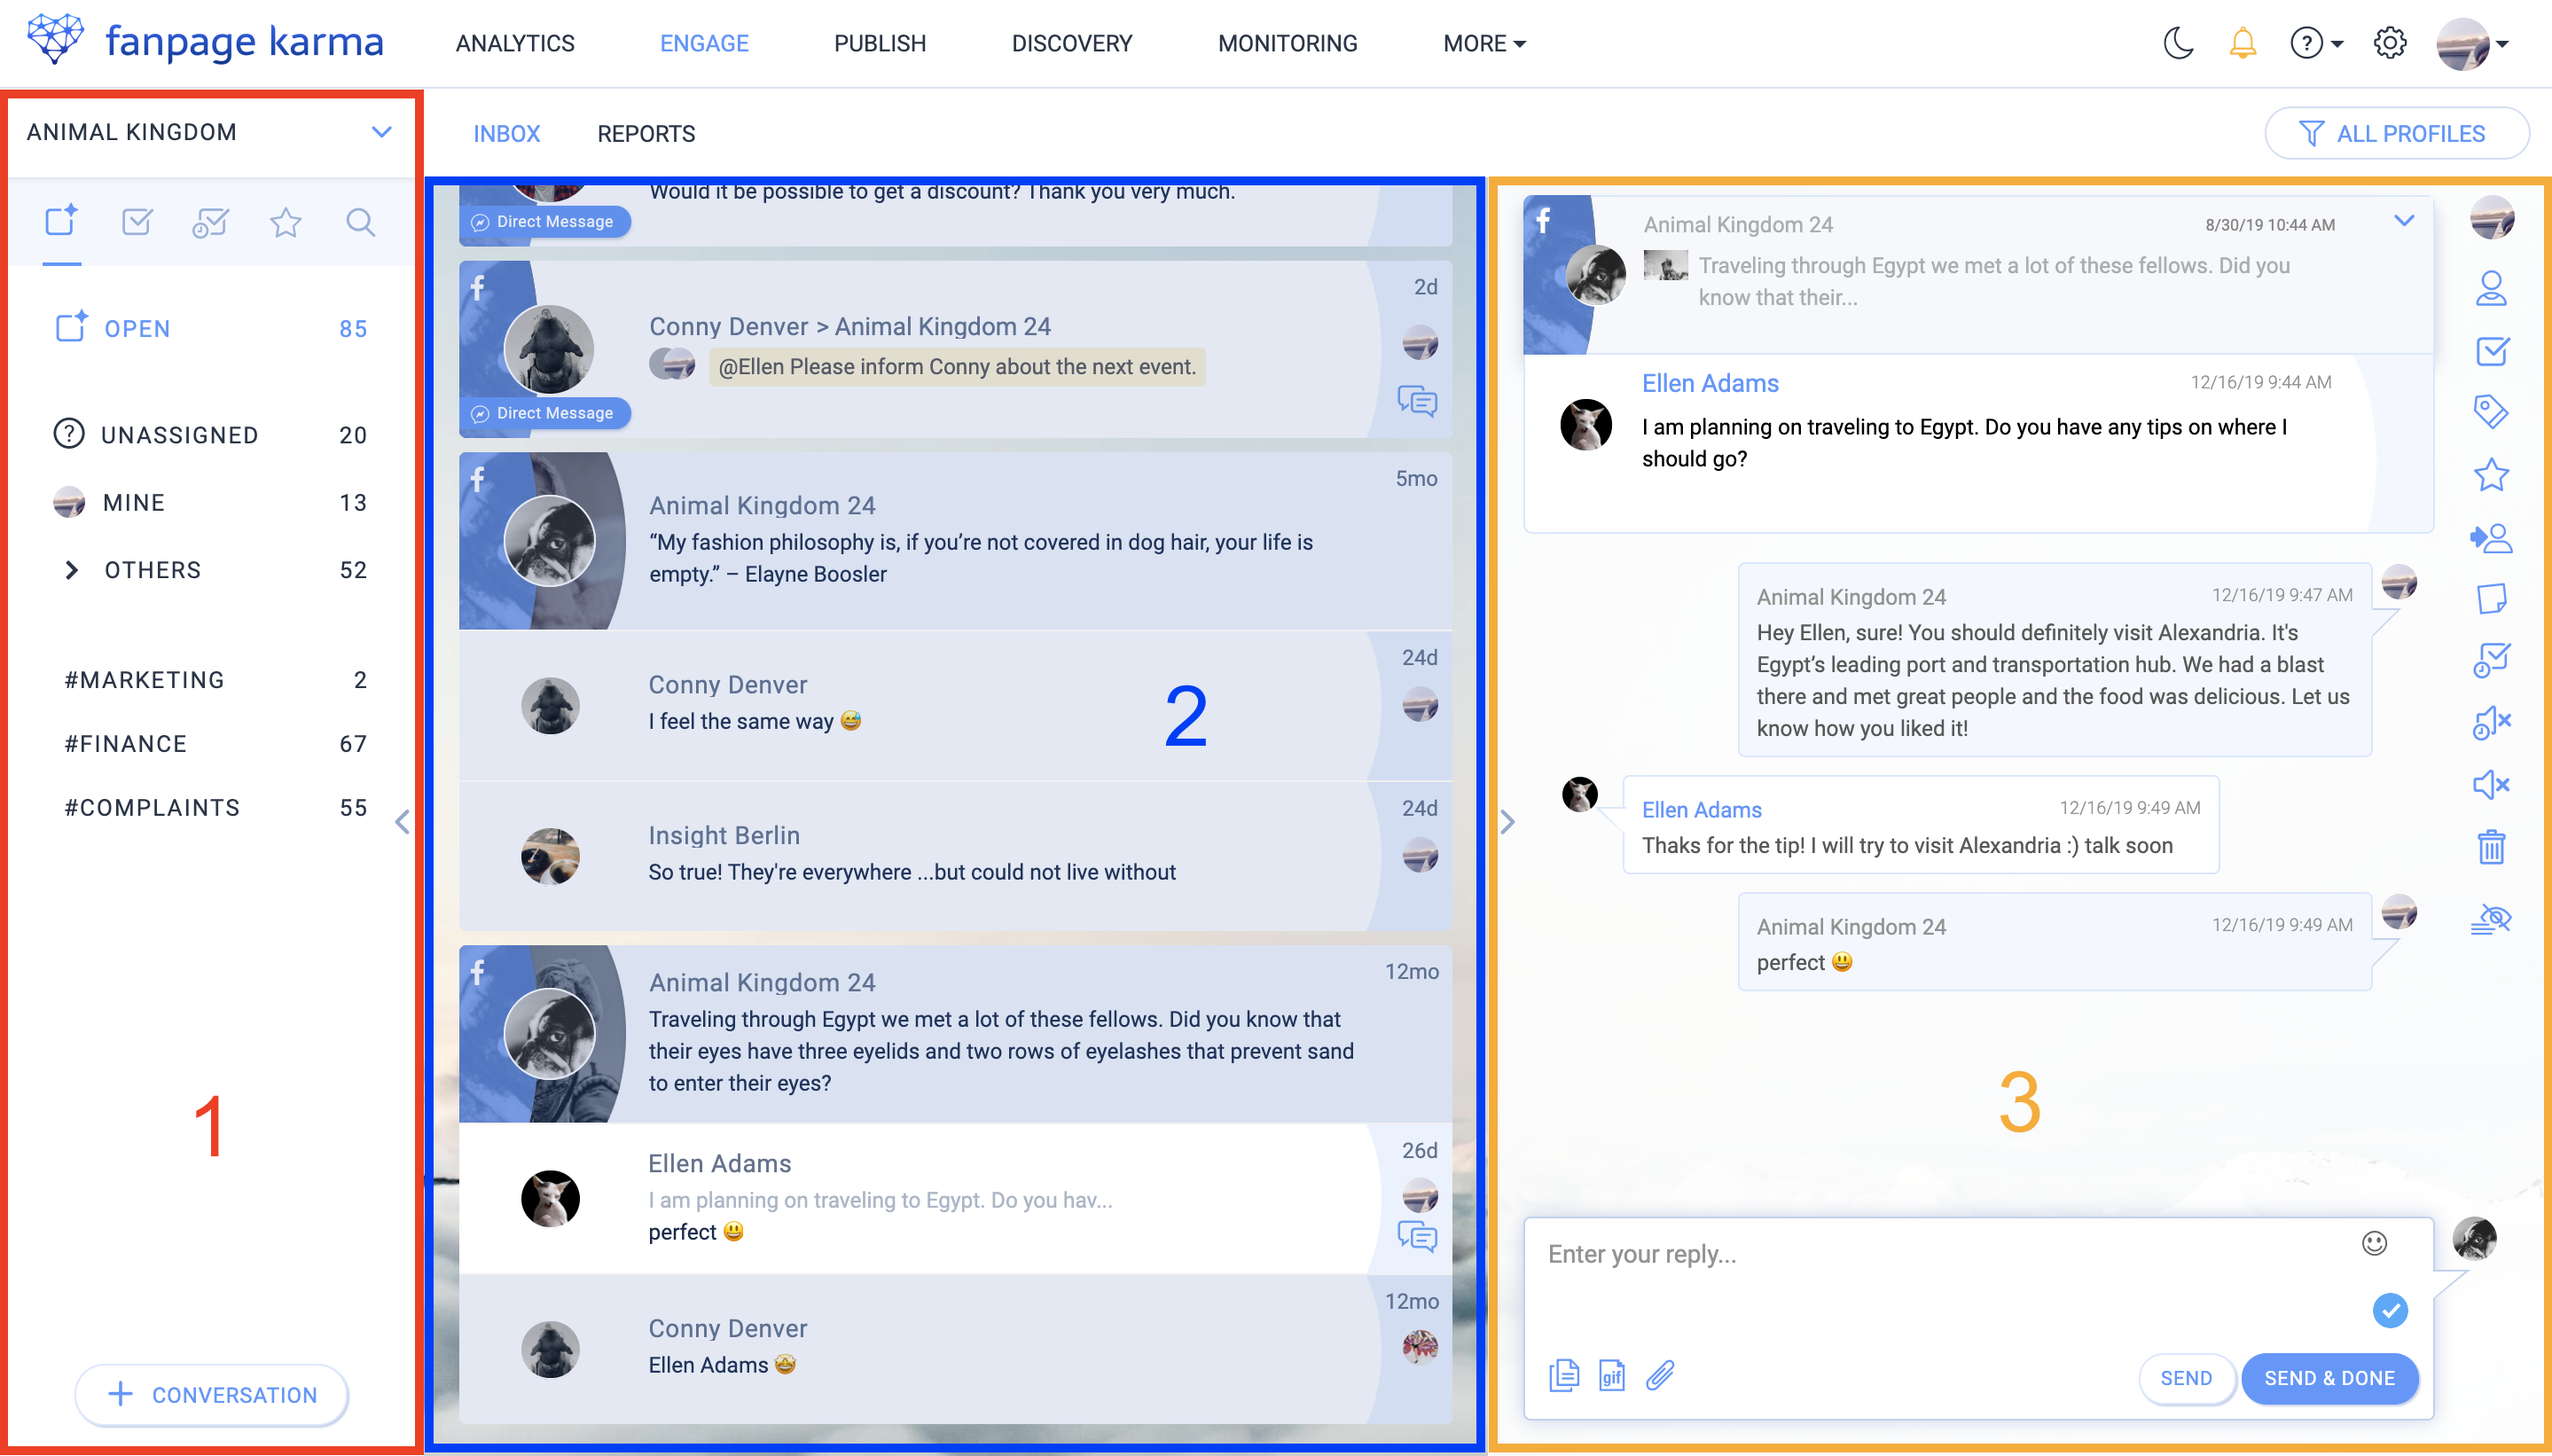
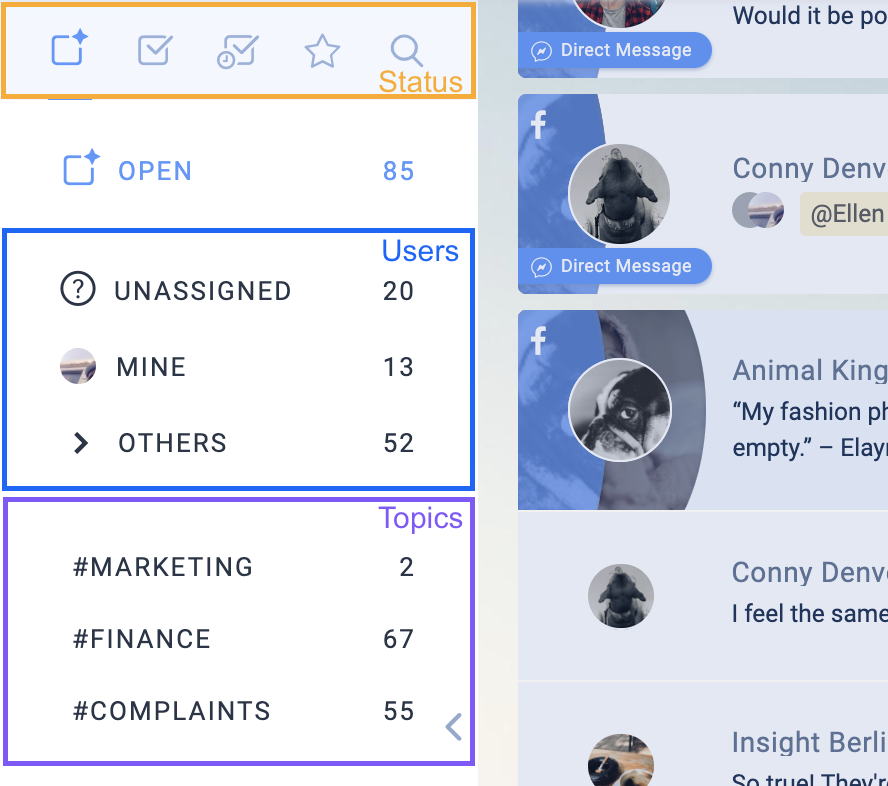
You can find your messages, i.e. the messages that have been assigned to you, in the “Mine” folder. Each of your co-workers also gets a separate folder for their tickets. If a message has no assigned contact person yet, it will be in the “Unassigned” folder.
Messages on specific topics can be found in the topic folders below the user folders. (See below for details).
Respond to messages
A green light at a folder indicates that a new message has been received.
- Go to the Open folder to see all messages that have not yet been checked in the center. The new message will appear at the top of the screen (you can immediately tell what kind of message it is by the colored highlighting and icons: Direct message, e-mail, comment on mail, user mail, mention)
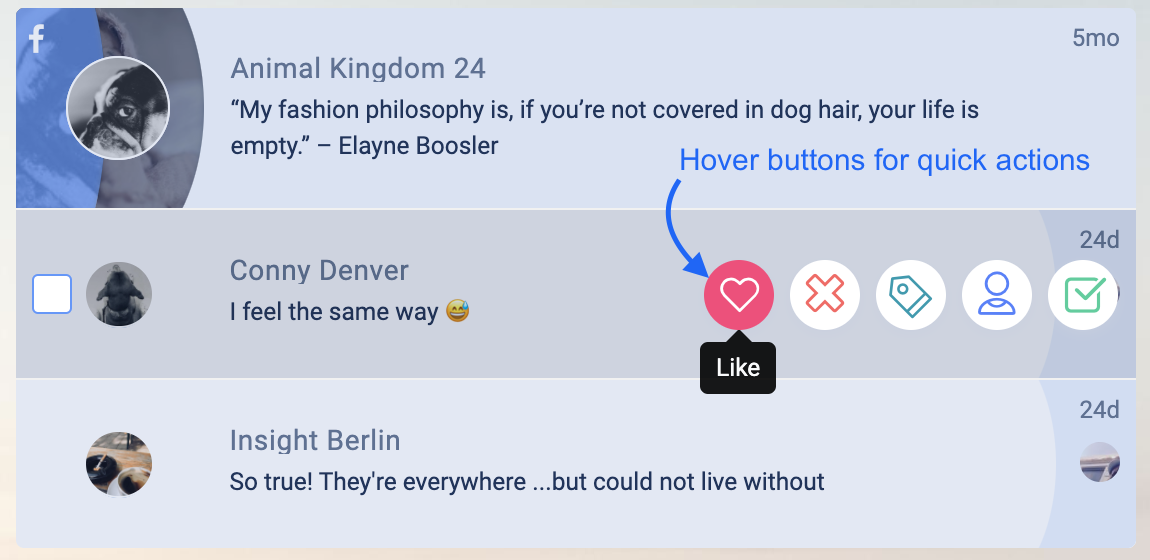
2. Use the hover buttons to perform quick actions such as checking, liking, retweeting or delegating
3. Click on the ticket to open the chat history and write a response. You can:
- Insert Gifs
- Attach files
- Insert template texts: Choose from your stored standard answers to be able to react even faster to requests
4. Send your message by clicking “Send” (or “Send & Done” to check the ticket at the same time)
Checked conversations disappear from the Open folder and can now be found in the Done folder.
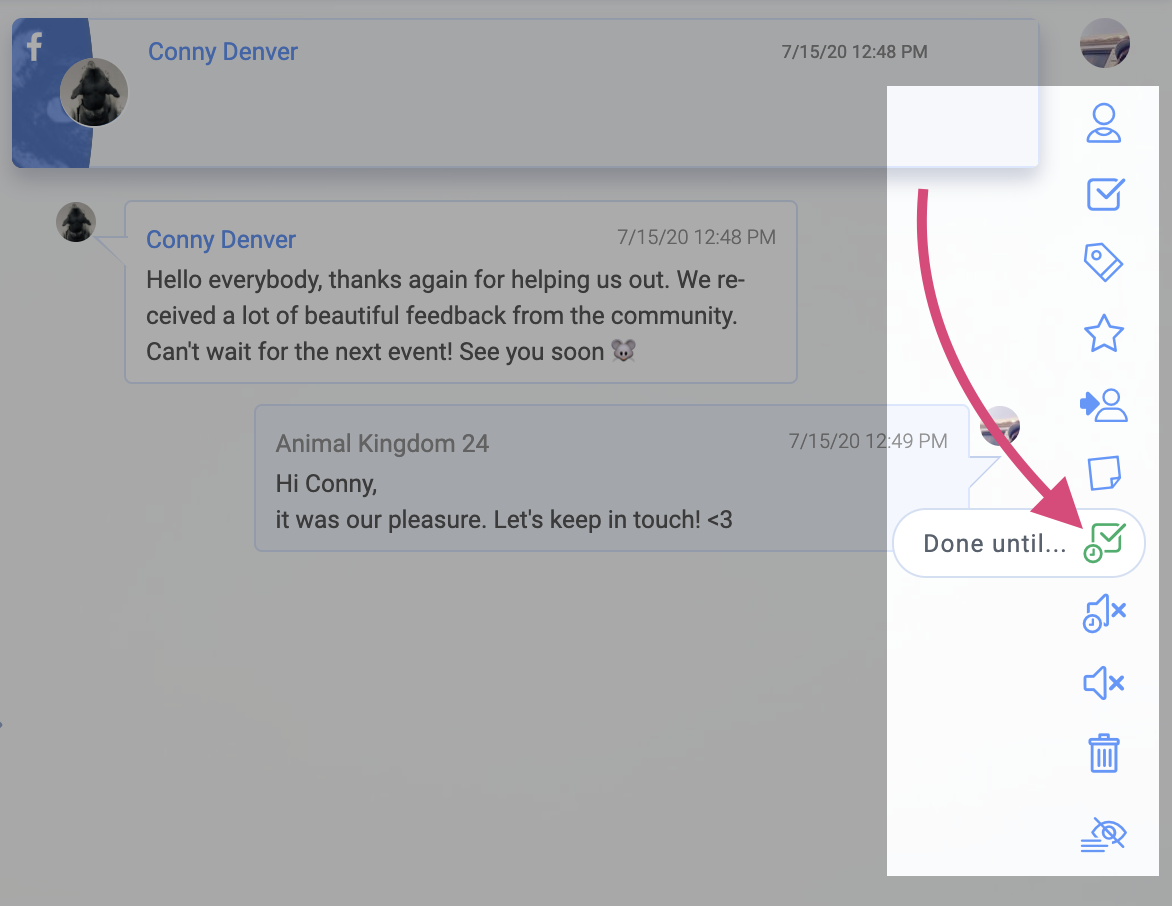
Tip: It happens that a query cannot be answered immediately. To prevent it from blocking your open tickets as a “sleeping ticket”, you can move it to a point in the future by clicking on “Done until”. The message will then disappear from your open tickets and will reappear there at the set time. In the meantime, you have a clear view of all messages that are currently relevant.
2. Teamwork
If there are several employees in the team, each one gets his own folder and messages can be divided among them by delegation.
To delegate a message:
- Click on the hover button of a message in the ticket view (or on the delegate button in the right bar of the chat view)
- Select the responsible person
The message now appears in the folder of the respective colleague.

Tip: It happens that you need the help/opinion of a colleague when replying to a message. If so, you can add an internal note with your question or comment to the chat history. It works like this:
- Click on the note button in the right bar of the chat
- Type the message and confirm with “Add”
The note now appears highlighted in yellow in the chat history of the ticket. It is only visible to coworkers.


3. Request External Feedback
If you also want to communicate about messages with people who are not using the tool, you should definitely use the feedback function.
Let’s say that your company is the subject of a hostile comment and you don’t want to decide how to handle it yourself. Using the feedback function, you can give your boss access to the ticket and he can help you by leaving comments. You do this as follows:
- Open the message.
- Click on “Ask for feedback” in the right-hand toolbar
- Enter your consultant’s details, formulate your question and click “Send” (the question will appear as a feedback note in the message history)
- The consultant receives an e-mail with a link to the conversation, which he has to click
- The consultant can now view the message history and write and send an answer to your questions (the answer appears as a feedback note in the message history)


Now you are informed and can implement the feedback of your consultant.
4. Tagging Folders: Sorting and Prioritizing Messages
For an overview it is very helpful to sort incoming messages by topic. To do this, all messages that belong to the same topic are given the same tag.
For example, you could create tags for error messages, cooperation requests or customer complaints. Then create a folder in the left bar for them. This way, you and your team will see all messages on the same topic at a glance and you can work through them systematically.
How to Create a Tagging Folder

- Create tags in the settings (unlimited number)
2. Activate the tags you want to have as folder by clicking on the folder icon
Activated tags receive a folder with the same name in the inbox. A maximum of 20 tags can be activated simultaneously.
Now you have to assign the created tags to messages:
- Click on the tag icon in the chat panel and select the corresponding hashtags
- It is even easier if you move the mouse over the conversation in the center area of the inbox and click on the button that pops up
- To tag multiple conversations at once, select them by checking them and then select “Add tags” on the right


For example, create tags for different user segments like #customers, #influencer or #cancellations or for internal departments like #marketing, #service or #hr. Under the tag #feedback you could, for example, collect messages in which users express their opinion about products. As soon as enough feedback has been collected, it can be evaluated for product improvement.
The topic folders work across the account and are therefore displayed in each profile group and for each user.
5. Little Helpers: Automate Processes
To save even more time and simplify the workflow in community management, some tasks can be automated. With the help of individually configurable little helpers, conversations can be identified and automatically processed, for example, on the basis of keywords, time spans or fan mentions.
Are there service hours in your company? If so, you should set up the system to automatically hide all comments received at night or on weekends. This way you can make sure that no Shitstorm on your profile starts when no one is in the office.
- Go to settings under Little Helpers
- Click “+ Little Helpers in Engage”
- Select Type “Time Slot”
- Give the little helper a name and click “next”
- Select the periods of time in the timetable that lie outside business hours
- Select the “Hide” action
- optional: select the additional action “Delegate” and select the co-worker who should view the hidden messages
- Save
- Select the channels (social media profiles, e-mail addresses) to which the little helper is to apply
- Save


Now all messages arriving outside business hours on the set profiles are automatically hidden. As soon as the Community Manager is back in his seat, he can calmly go through all messages and make those that contribute to a good and constructive atmosphere visible again. This ensures that there is no fooling around with the profiles and that you and your colleagues can sleep peacefully.
Are there issues that are only dealt with by very specific people, for example billing issues? Then you should create a helper that automatically delegates all messages containing certain words like invoice, refund, discount or sales tax to those people.
- Go to settings under Little Helpers
- Click “+ Little Helpers in Engage”
- Select Type “Trigger words”
- Give the little helper a name and click “next”
- Add all keywords for which the helper should become active
- Select the action “Assign” and choose the responsible employees
- Save
- Select the channels (social media profiles, e-mail addresses) to which the little helper is to apply
- Save


Voilà! Now all messages are automatically assigned to the right contact person.
Do your profiles often receive mentions on posts? Then you should set a little helper to automatically check them off in Engage. While these comments make for good post interaction, they are rather annoying in the inbox because they don’t require an answer.
- Go to settings under Little Helpers
- Click “+ Little Helpers in Engage”
- Select Type “Fan Tags”
- Give the little helper a name and click “next”
- Select a number of characters up to which the little helper should become active (this is for safety’s sake, if there is a mention, but more is said in the comment)
- If necessary, select keywords where the helper is to skip
- Select the action “Done”
- Save
- Select the channels (social media profiles, e-mail addresses) to which the helper is to apply
- Save


Yay, now your inbox is free of annoying mentions!
These were just a few examples of how you can let the little helpers work for you. Surely you can think of more useful possibilities…
Your turn!
As you can see, these tricks can save you a lot of work and time when answering messages. Go for it!
Do you have any questions? Then let us know at service@fanpagekarma.com!